Showing posts with label DIY. Show all posts

Thursday, October 18, 2018

Girl Chat {October 2018}

Here we are again, another installment of Girl Chat which means a month has gone by! How does that happen so fast!?!

This months topic is all about sharing a DIY product/craft and I cannot wait to read through the posts!! I love getting inspiration!

One of my favorite DIY's of this season is this Harvest sign I made - I am so happy every October when I realize I have this to put on our front porch with some mums & pumpkins!

You can read all about how I made this sign here


$12 Harvest DIY Sign


And for a craft, I still love this paint chip pumpkin/turkey we did a few years ago. I give myself credit because I actually thought of this one all on my own šŸ˜‚ you can read how we made it here


This Happy Life: paint chip pumpkin turkey {craft}


Grab our graphic and link up below, we love to read about DIY's and crafts all the time!


Add caption

And don't forget to follow your hosts!

Danielle - Bloglovin / Instagram / Pinterest
Emily - Bloglovin / Instagram / Pinterest 
Lindsay - Bloglovin / Facebook / Instagram / Pinterest / Twitter
Lizzie - Bloglovin / Facebook / Instagram / Pinterest
Sierra - Bloglovin / Instagram / Pinterest / Twitter / Facebook

Wednesday, May 23, 2018

New Hose Holder

Today I'm sharing a super easy project we recently did to solve our front yard hose problem.  I'm a little embarrassed to show you how we kept it before this project, but I try to always keep it real so you'll get a nice, good look. (and go ahead and judge away because it was awful!!)

So yeah, here is how we had our front yard hose for a long time. We once had one of those storage boxes that you rolled the hose into, but honestly it was such a pain and I find those don't work very well. 


After browsing Pinterest I saw the super easy solution that would also look pretty.  I took off to the store to get my supplies (all of 2 things) and came home to make it happen.

What you need:

A 4'x4' fence post (you can find at any hardware store)
A wall mount hose rack (also found at the hardware store or even Walmart)
Spray paint (color of your choice, but we went with black and we already had on hand)


I had Rick screw in the wall mount hose rack into the fence post then all I had to do was spray paint - THAT'S IT. Once it was dried, Rick dug super deep and put it in the ground for me and voila, project complete!! I wish all my projects were this easy, haha.


So what do you think? At some point, I would like to switch out to a darker hose but I honestly don't really mind the green. I think it looks perfect where we put it and no matter what, it's better than it was LOL


*linking up with Jessi's Design Lindsays Sweet World

Tuesday, November 7, 2017

DIY Wood Photo Slice

*this post contains affiliate links


Happy Tuesday!! Today I'm sharing something I think is pretty awesome and would make a great holiday gift! Not only is it super cute, it's also super inexpensive (right up my alley) - if you're in my FB Group, you may have already seen this, if not here it is: also, if you're not in my group you totally should be :)


To make this DIY Wood Slice Photo you only need 2 supplies!!

*Wood slice – medium size -->http://amzn.to/2zkGSUz (you can also find at your local craft store)

*Silhouette tattoo transfer *you do not need to own a silhouette to make this, just a printer -->http://amzn.to/2y9HjzK (again, you could find at your local craft store but I found Amazon to be the cheapest because you can't use a coupon on this at the craft store) ** this comes with 2 white sheets and 2 vinyl sheets so you could make 2 wood photo slices 


**This is important - Make sure to flip your picture on your computer so it shows up correctly (this only applies if your picture will look different when flipped - I used flipapicture.com to do this)

Step 1- Print your picture onto the white tattoo paper, (make sure to print on the shiny side) I printed mine as 8” x 10” size
Step 2 - Take the clear adhesive sheet (with the green backing) and cover your white sheet on the picture side with it, smooth out any bumps
Step 3- Trace around the wood slice with your sheet and then cut it out
Step 4 - Remove clear adhesive and turn picture over on top of wood slice (photo facing down)
Step 5 - Use a damp rag to press down on the white paper, then slowly remove the white paper


That’s it!! So easy!! Now if you want to hang it, you could always add a picture hanger to the back or get one of those stands from a craft store (the ones that hold plates)


Tuesday, October 31, 2017

DIY Mickey Frame

Happy Halloween!! We're looking forward to trick or treating later even though it's going to be FREEZING!

Image result for funny mom halloween quote


This year when we went to Disney, I knew I wanted to do an autograph picture mat. The kids had their autograph books too, but this was something extra. I purchased an 11" x 14" mat and was the one in charge of keeping it safe in the backpack.  I can't tell you how nervous I was everyday that something was going to happen to it!

When we got home, Rick said he wanted a cool frame to put it in, not just some boring one. So of course I headed to Pinterest to see what I could do.  I came across this picture and that's where my inspiration came from.

I went to Joanns and got a basic black frame for about $8, then I bought a piece of white foambard. I already had glitter on hand so this little project didn't cost much at all.

The first steps were to cut out the Mickey ears out of the white foamboard. Then I had some cute little helpers paint them black for me.  Once dried, we painted Modge Podge over them and added the black glitter.


For the bottom half of the frame, I painted it red. I painted probably 3 coats. Once it was dry, we put the glitter on the frame using Modge Podge again. Once everything was dry, I sprayed the ears and the frame with a clear spray sealer to keep the glitter from getting everywhere.  Once it dried again, I super glued the ears to the top.


I loaded our mat and our picture in and bam, it was done! We finished this little project in one afternoon and I love that my girls helped me!

Rick was super happy with how it turned out and he thanked me for doing something fun vs a plain frame. I'm just glad he liked all the glitter LOL!


A close up


It's the only thing we've hung up in our basement so far and every time I see it, it makes me happy!


Well I'm off to volunteer at 2 Halloween parties today!! Hope everyone has a fun & safe Halloween!


*linking up with Lindsays Sweet World & Our Pretty Little Girls


Wednesday, August 16, 2017

Marble Run Fun!!

Part of  our Summer Fun bucket list was to make a marble run. I originally saw the idea on where other than Pinterest

This is quite possibly the easiest thing we've ever made and SO cheap! I'm talking like this cost me $1 to make!! Yes, it's not as perfect as the one I found on Pinterest, but that's besides the point. Main point here is that it cost me $1 to create hours of fun! Did you hear that? Hours of fun this has brought us so far!! When you find something like that with kids, you know you've hit the jackpot.


To make this all you need is the following:

  • Large piece of cardboard or some kind of thick board (we used a piece of cardboard fromt he box our new dishwasher came in)
  • popsicle sticks (found mine at the dollar store)
  • Glue gun & glue sticks
  • Cups


First, we cut some popsicle sticks up to smaller pieces, from there I just kind of eye balled where to put the popscile sticks on the cardboard. Using the glue gun, I would glue lines and the big kids would put the sticks on.


Seriously, this took all but 5 minutes! Once we were done with gluing the sticks, we grabbed some paper cups we had on hand and glued them to the bottom.

We worked on this when Avery was napping but made sure to include her as soon as she woke up!


The kids came up with the numbers to write down and every time someone gets in the 1,000,000 cup, they scream so loud, it's so cute.


And there you have it, cheap, easy and FUN!!


I hope you try this - your kids will love it!


*linking up with Jessi's Deisgn


Wednesday, March 15, 2017

{DIY} Pot of Gold

I'm all about making holidays extra fun for my kiddos. I enjoy giving them something special and with St. Patrick's Day right around the corner, I started thinking of what their something special would be this year.

While I was walking the isles at the dollar store I saw these tiny clay pots that came 3 in pack (perfect!) so the idea came to make them each their own little pot of gold.  I plan on setting these out for them Friday morning.


These were so simple to make, which was good because I did it last week while I was still recovering and a nice easy craft was just what I needed. Anything more complicated than this and I probably wouldn't have had the energy.

Here's what you need:


  • Small clay pot (as I said, I found 3 mini ones at my dollar store. They are probably 3")
  • Black paint
  • Gold glitter
  • Gold chocolate coins (or whatever candy you want to fill it with)

I just painted the entire pot black, let it dry, then used glue around the edge and poured the glitter over. SO EASY! I filled each one with some chocolate coins and done!! I can't wait to see their little faces when they see these Friday.


Do you do anything "extra" for your kids during St. Patrick's Day? 


Tuesday, January 31, 2017

New Clock {DIY}

You know those projects you start and then never seem to get around finishing? This clock was that for me. I originally started this last September but it was just finished a couple of weeks ago.

Going back - Months ago I started thinking how I want a clock above my fireplace. I've had many different things above my mantel but nothing ever seemed right to me.

Enter this clock I saw online:

via

I knew this would look amazing above our fireplace but that price tag, woah, way outta my budget. I then went to Pinterest and started searching planked clocks.  I saw a few and they seemed easy enough (thanks to my super handy hubby) and decided to give one a try.  I don't have a full tutorial for this, but I'll explain how I made it.


I didn't follow any set plans, just went to Home Depot and picked up some wood and had them cut it there

Once I had that done, Rick helped me glue the boards together. Once dry, he cut out my giant circle

From there I stained it a dark brown, jacobean to be exact, and after that dried I painted on some cream/white paint we had already. I wanted a distressed look so I scuffed it up in some areas and even used a screwdriver to bang it up as well. 


Now for the hard part - I wanted my roman numerals to be big, metal pieces rather than just paint them on (which would have been soooo much easier and cheaper) so the hunt was on for that. I ended up finding a seller on Etsy that wasn't too pricey so I ordered those and went ahead and purchased this spray paint to paint them.


When I was ready, I used gorilla glue to glue the numbers to the clock. Then came the next obstacle. I wanted this to be a working clock because it was going to be such a big statement piece I just thought that made sense. I originally ordered a clock motor and hands off Amazon and when it came, the thread shaft (the part in back that sticks through your clock) was too short to fit through my wood which is about 3/4" thick. 

So I found a different clock motor that had a longer shaft (no pun intended) and when it came, the hardware that was sent with it didn't fit. I was getting frustrated at this point because I just wanted the clock DONE. So my awesome hubby drilled a hole in the back of the clock so we could use the original clock motor. 


And with that, the clock was now complete! Well, almost. I wanted the clock to hang on the fireplace wall, not just sit on the mantle. so Rick had to drill a hole into our stone and place a nail in it. Then we added a sawtooth picture hanger on the back of the clock, and now it was done!


I am in love with this clock so much! I know it's not really close to the one I originally saw, but I think I love it even more. I love the fact that we created this beautiful piece for our home. Can I say love anymore??


After this was all said and done, Rick remembered Menards sells already cut large circles of wood - that would have been nice to know 6 months ago :)


I think this is one piece of decor that will be sticking around for a long time :)


Wednesday, January 4, 2017

Lego Travel Box {DIY}

Happy Hump Day!

A few years ago I made a lego travel box for Brayden and then with our move it got lost (aka my husband probably threw it out). For Christmas I knew I wanted to make him another one as well as one for Ella. The plan is to keep the boxes in the car so they can have something to do while we're driving.

Making these travel boxes is so easy, today I'm going to show you how

First you need an unfinished wood box - I found mine at Hobby Lobby and bought the medium size ones. (don't forget to use their 40% coupon!)


Next step is to paint whatever color you would like


I purchased these lego baseplates and cut them using regular scissors to fit on the top of the box (tip: regular legos and lego duplos work on standard baseplates)


I used superglue to secure the baseplates.


For a little extra, I used stickers I had on hand to put my kids' names on the back of the boxes.


Grab some legos and have at it! So easy, right!?


I hope you give this a try, my kids LOVED them when they opened them on Christmas and have been using them since.


*linking up with Jessi's Design

Tuesday, November 22, 2016

Turkey Handprint Plate {DIY}

Hello there Tuesday! I don't know about all of you, but I am in the best mood this week! The holidays are here and we have so much fun stuff coming up!

Today I'm sharing an adorable turkey handprint plate the kids and I made over the weekend. Well, technically it's a handprint and a footprint plate.

I love making these plates, you can see the one we made for Christmas 2 years ago here.  I plan on doing one for each upcoming holiday, I need to get them done before Brayden's  hands/feet don't fit anymore!


Here's what you need:


  • White plate (I found mine at the Dollar store)
  • Gloss enamel paint (must be the gloss enamel kind)

For this plate, I did Ella's footprint first, let it dry, then did Brayden's handprints, let those dry, and finally Avery's handprints.  Once the handprints were dry, I went back over the turkey with brown paint to fill it in. The reason I did the foot first is because I actually tried this before and did the handprints first, then the footprint and the turkey looked more like a peacock - the feathers were not coming right out the sides. It was pretty comical looking and I figured since the plates are only $1, we would try again.  I'm so glad we did!

Once the brown paint was dry, I painted on eyes and a nose. Then I went around the plate and made dots. 

Then it was time to bake at 325 degrees for 30 minutes. The back of the paint bottles actually says to wait 4 days to bake, but I've never done that and my plates have held up just fine (I have one of just Brayden and Ella from a few years ago and it's still in perfect condition)


And there you have it, a super easy and adorable momento to celebrate the holiday and also remember how little your kids hands/feet are!


*linking up with Our Pretty Little Girls


Wednesday, October 19, 2016

Design Your Own Holiday Card {tutorial}

I've seen so many bloggers talking about holiday cards lately and it put me in the mood to start on ours! While I wish I could say this would be a sponsor post with Minted or Shutterfly, it is not (but seriously, how can I make that happen because I'm super jealous of all of you)

Anyway, last year I designed our card (for free) myself using PicMonkey and didn't document the process, so I thought I would this year. PicMonkey has tons of options to choose from for free, and they have even cooler stuff if you become a Royale member, but this Mama is all about free, so that's the route I take when I use their site.

Here is last years card (I loved how it turned out!)


Ok, so first thing I do when I'm getting ready to make our card is browse other websites to get ideas. Once I see something I like and that can be closely replicated, I then go to PicMonkey and get started.


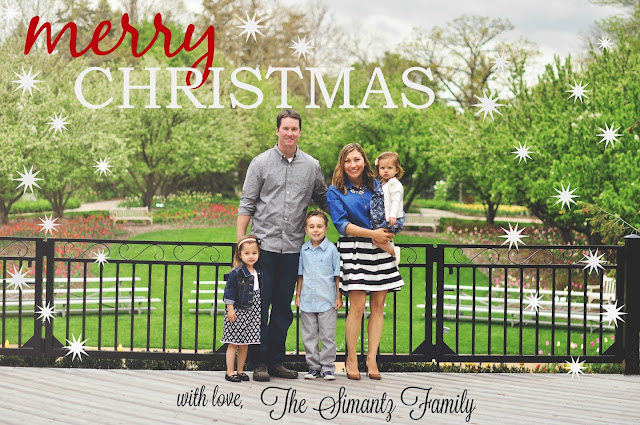
Here is the picture I chose for this years Christmas card


Step 1. Once you log onto to PicMonkey, hover your curser over the top of the page and options will drop down.  Click on Design.


Step 2. Click Open and chose your image you are going to design


Step 3. Your image will now be to the right and you need to choose the Tt on the left hand side to get to the text options.


Step 4.  Start messing around with different fonts and choose what you like best. You can customize the color and size as well. Just click add text and a box will appear on your image. You can drag it anywhere on the design.


Step 5.  Click on the butterfly logo to the left - that is where you find the overlays, aka the objects you can use to enhance your design. Choose whatever one works for you!


As you can see, I clicked on one of the stars and just added a bunch to my design.


My idea was to make them look like snowflakes so I changed them to white and made them smaller.


I chose to scatter the snowflakes on each side of my card to look like falling snow


Step 6. Once you are done adding overlays to your design, it is time to go back to the text (Tt) and choose your font for your signature. You can do this at the same time as you are writing your holiday message, but I like to do it at the end.


And that's it, you are done.  I chose to go a more simple route this year and love it!


Now you can upload to anywhere and have them printed.  I usually choose Costco or Vistaprint because they are the most inexpensive for good quality. I also always choose just to buy the cards, not the envelopes because I can go to Michaels and get 50 for a good price while using a coupon of course!

Here's a tip if you do use Vistaprint - upload your image and have it printed on a postcard in your choice of size, it is a fraction of the cost vs. using an invitiation or holiday card template.

I would love to know if anyone uses this method to create their holiday cards!


Oh and if you like this post, you can hover over the below image and pin it directly to Pinterest to save for when you need it! (and it would be much appreciated!)


*linking up with Jessi's Deisgn for What's Hap-Pinning

 
BLOG TEMPLATE BY DESIGNER BLOGS